The Add-to-Cart button in WooCommerce comes in a default look and is not quite appealing. Some simple customization transforms the plain view into a smart and stunning shopping basket. And, this we are learning today, how to customize WooCommerce Add-to-Cart button.
In this tutorial, we are covering 4 individual customizations for the button.
Ways Are
For the process, we will show you two ways to modify the button appearance. One is adding custom codes and another is using a plugin.
Pre-Requisites
- Access to WordPress
- Child theme activated (Not mandatory)
- WooCommerce plugin activated
Note
Use the Child Theme so that any codes you use do not get erased on theme updates.
This is going to be less narrative and more informative, so let’s get started without further delay.
How to customize WooCommerce Add-to-Cart button text
The text of the Add-to-Cart button comes in a default form in WooCommerce. But, you can change it for a different message.
Change Add-to-Cart button text without plugin
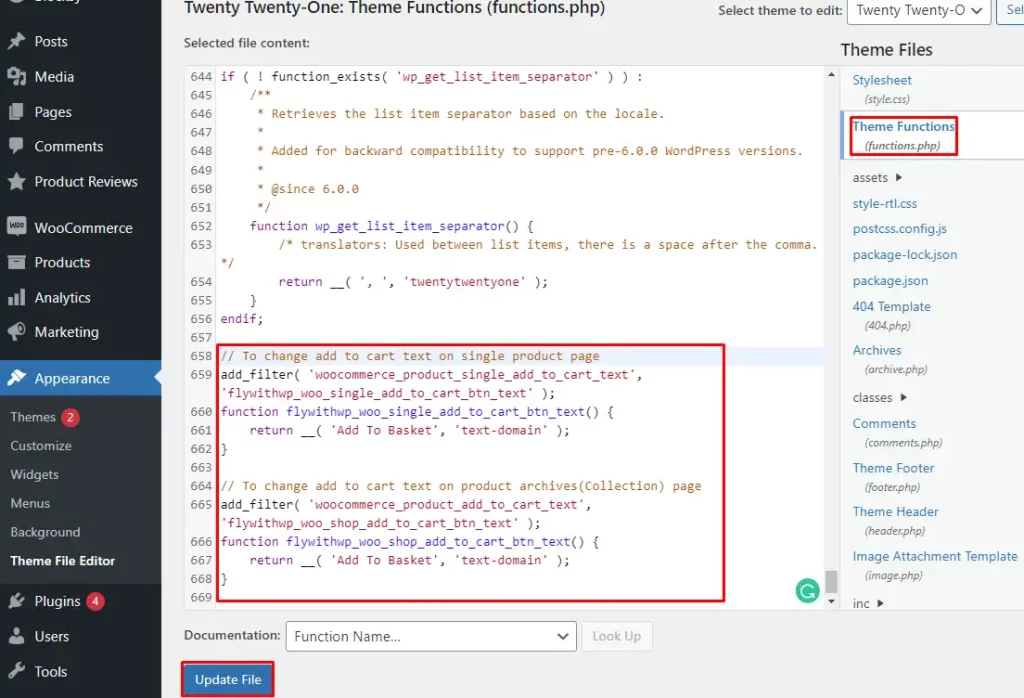
Go to WordPress Dashboard>Appearance>Theme File Editor and select Functions.php. At the end of the lines, add the code we are providing below. We created individual code sets for single product pages and product Archive pages. You can use them both together. Hit the ‘Update File’ button for the impact.
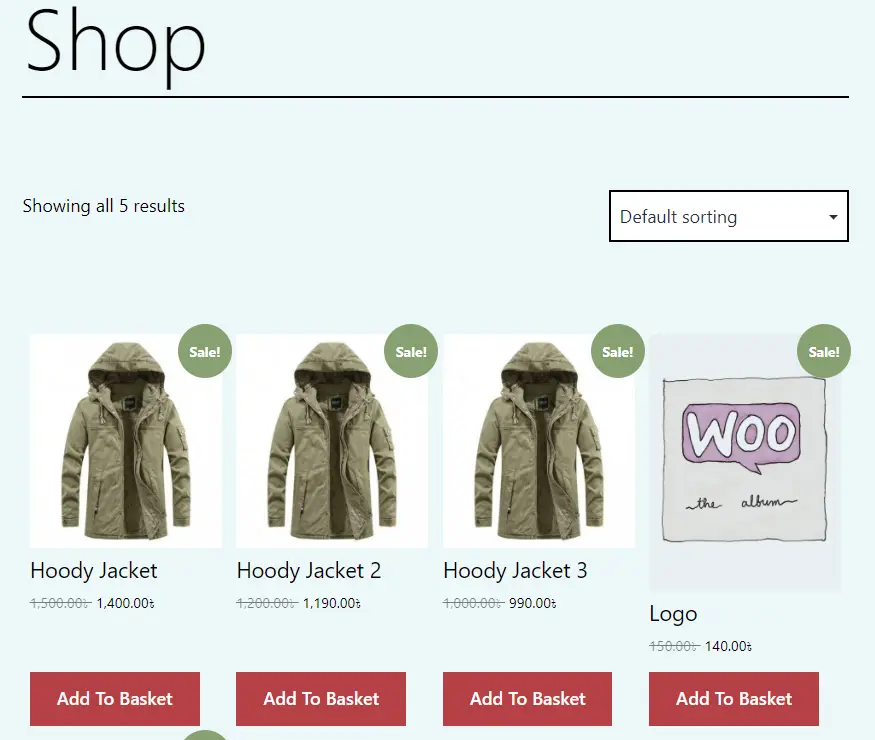
We have changed the text from ‘Add to Cart’ to ‘Add To Basket’ in the codes. You can change the text as you need for your e-shop product pages.
For single product page
// To change add to cart text on single product page
add_filter( 'woocommerce_product_single_add_to_cart_text', 'flywithwp_woo_single_add_to_cart_btn_text' );
function flywithwp_woo_single_add_to_cart_btn_text() {
    return __( 'Add To Basket', 'text-domain' );
}
For Archive product page
// To change add to cart text on product archives(Collection) page
add_filter( 'woocommerce_product_add_to_cart_text', 'flywithwp_woo_shop_add_to_cart_btn_text' );
function flywithwp_woo_shop_add_to_cart_btn_text() {
    return __( 'Add To Basket', 'text-domain' );
}
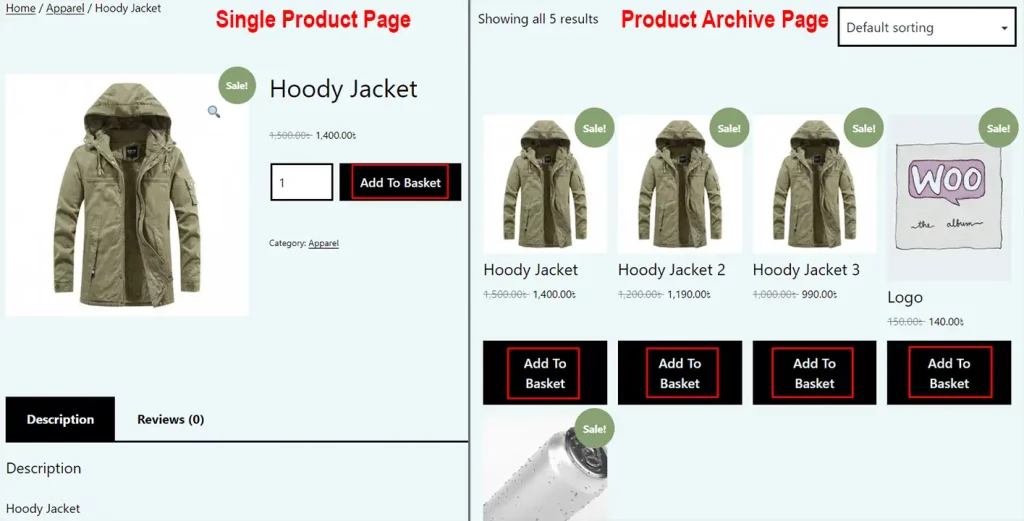
Here is the final output after adding both the codes.
Note
After using custom codes, it is better to clear the cache. Use Ctrl/Command+F5 for Win/Mac to do that in short.
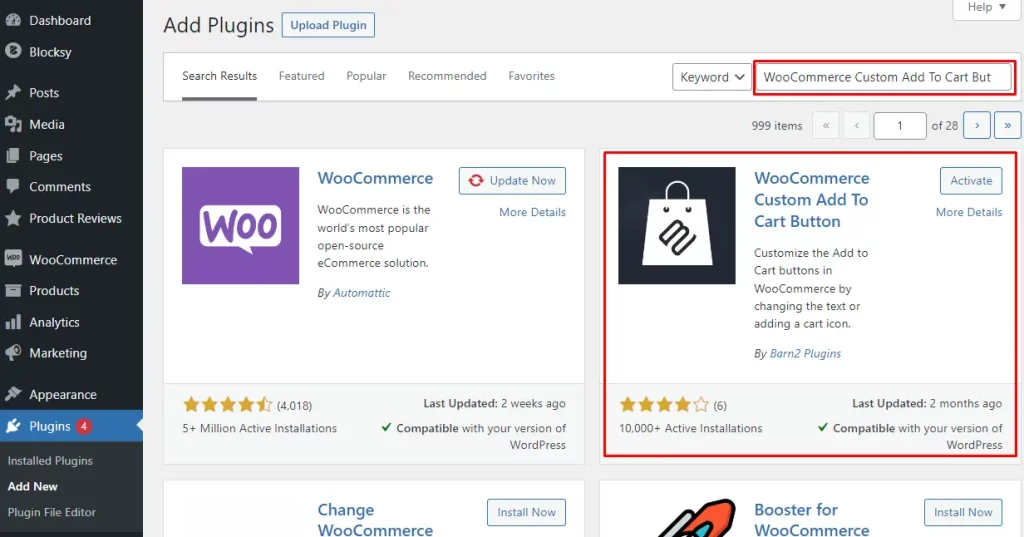
Change Add-to-Cart button text with a plugin
To change the Add-to-Cart button text with a plugin, use the ‘WooCommerce Custom Add-to-Cart Button’ plugin. It is free to download and use. Go to WordPress Dashboard>Plugins>Add New and search by the name.
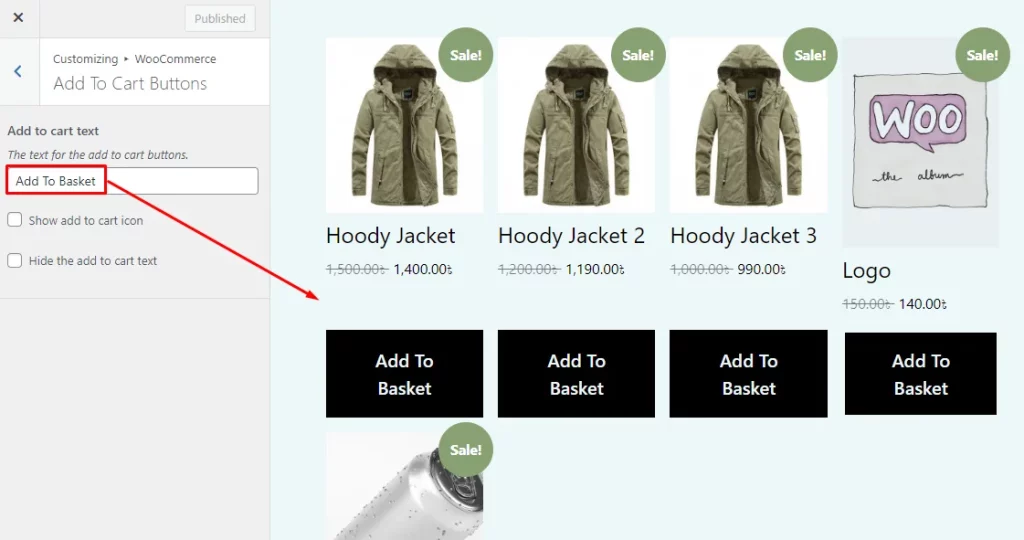
After installation and activation, go to WordPress Dashboard>Appearance>Customize and open WooCommerce feature. Inside WooCommerce, you will have the Add-to-Cart customization feature added.
Just change the text and all the button text will be changed for both product Archive pages and single product pages. Hit the publish button to save changes.
How to Replace the WooCommerce Add-to-Cart Button Text with An Icon
It comes with a different presentation where the text inside the Add-to-Cart button is no longer necessary. So, replace it using a cart icon.
Replace the WooCommerce Add-to-Cart text with an icon without plugin
To customize WooCommerce Add-to-Cart button replacing text with an icon requires custom codes in two parts. Combining both, the result will be visible properly. After applying custom codes, clear the cache before seeing the final output.
Part 1: Insert code in Functions.php
Go to WordPress Dashboard>Appearance>Theme File Editor. Simply copy the code given below and paste it at the end of the line under Functions.php. This will add the cart icon by replacing the text.
Notice
Used cart icon URL is, ‘https://cdn-icons-png.flaticon.com/512/263/263142.png’. You can replace that using your own.
Code for Functions.php
add_filter('woocommerce_loop_add_to_cart_link', 'flywithwp_woo_add_to_cart_replace', 10, 2 ); // shop
function flywithwp_woo_add_to_cart_replace() {
    global $product;
    $link = $product->get_permalink();
    echo do_shortcode('<a href="'.$link.'" class="button add_to_cart_button flywithwp_cart_btn ajax_add_to_cart"><img class="flywithwp_cart_btn_img" src="https://cdn-icons-png.flaticon.com/512/263/263142.png" /></a>');
}

add_action( 'woocommerce_single_product_summary', 'flywithwp_woo_add_to_cart_replace_single', 1 );
function flywithwp_woo_add_to_cart_replace_single() {
	global $product;

	// For variable product types
	if( $product->is_type( 'variable' ) ) {
		remove_action( 'woocommerce_single_variation', 'woocommerce_single_variation_add_to_cart_button', 20 );
		add_action( 'woocommerce_single_variation', 'flywithwp_woo_add_to_cart_button', 20 );
	}
	// For all other product types
	else {
		remove_action( 'woocommerce_single_product_summary', 'woocommerce_template_single_add_to_cart', 30 );
		add_action( 'woocommerce_single_product_summary', 'flywithwp_woo_add_to_cart_button', 30 );
	}

}

function flywithwp_woo_add_to_cart_button(){
	global $product;
    $link = $product->get_permalink();
	echo '<a href="'.$link.'" class="button add_to_cart_button flywithwp_cart_btn"><img class="flywithwp_cart_btn_img" src="https://cdn-icons-png.flaticon.com/512/263/263142.png" /></a>';
}
Part 2: Inserting code in Additional CSS
Still, you need to style the cart along with the button. Go to WordPress Dashboard>Appearance>Customize. Copy the code given below and inside Additional CSS paste it.
We have used the Add-to-Cart button width of 25%. Change the value if you need a different width.
Code for Additional CSS
.single-product .flywithwp_cart_btn, .single_add_to_cart_button{
		background: white !important;
		box-shadow: none;
		text-shadow: transparent !important;
		color:white !important;
		border-color:blue !important;
		text-align: center !important;
}

.woocommerce-shop .add_to_cart_button{
		background: white !important;
		box-shadow: none;
		text-shadow: transparent !important;
		color:white !important;
		border-color:blue !important;
}

.flywithwp_cart_btn {
   	display: block !important;
    margin: 0 !important;
    padding: 5px !important;
		width: 25% !important;
}
.flywithwp_cart_btn_img{
	margin-bottom: 0px !important;
	width: 25px !important;
	margin: 0px auto !important;
}
The result is here.
Replace the WooCommerce Add-to-Cart text using an icon with a plugin
Use the ‘WooCommerce Custom Add-to-Cart Button’ plugin again to do the same. Go to WordPress Dashboard>Appearance>Customize. In the WooCommerce Customizer’s Add-to-Cart feature, put a tick mark for both the options;
- Show add to cart icon
- Hide the add to cart text
You are done. The plugin gives you limited functionalities only but serves the purpose if you want to avoid using custom codes. Here is the result.
How to customize WooCommerce Add-to-Cart button color
Here we go with both ways to change the color of the Add-to-Cart button without a plugin and with a plugin.
Change Add-to-Cart button color without plugin
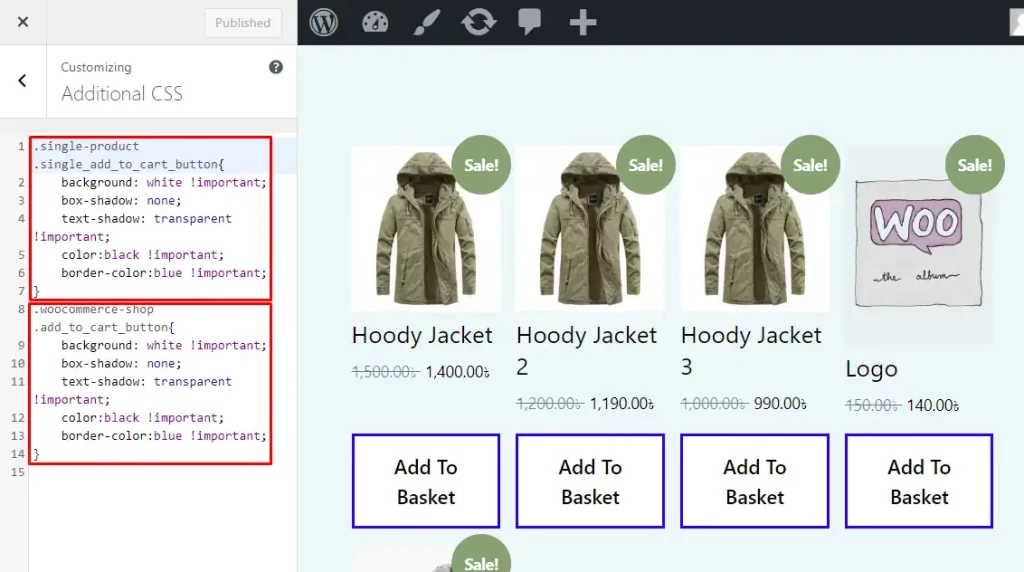
Go to WordPress Dashboard>Appearance>Customize and inside Additional CSS, add the code. Here also, you have individual code sets for single product pages and product Archive pages.
We have made a few changes to the button color. You can change the colors in the custom code sets.
- Button Color: white (use any color name or HEX code)
- Text Color: black (use any color name or HEX code)
- Border Color: blue (use any color name or HEX code)
Code for Single Product page
.single-product .single_add_to_cart_button{
		background: white !important;
		box-shadow: none;
		text-shadow: transparent !important;
		color:black !important;
		border-color:blue !important;
}
Code for Archive Product page
.woocommerce-shop .add_to_cart_button{
		background: white !important;
		box-shadow: none;
		text-shadow: transparent !important;
		color:black !important;
		border-color:blue !important;
}
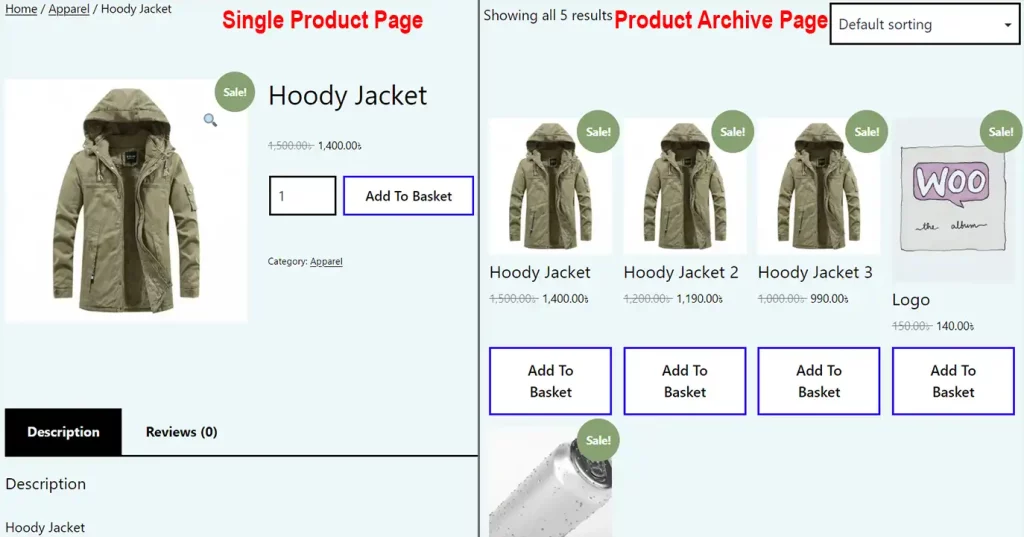
The final output after adding both the codes in Additional CSS is here.
Change Add-to-Cart button color with a plugin
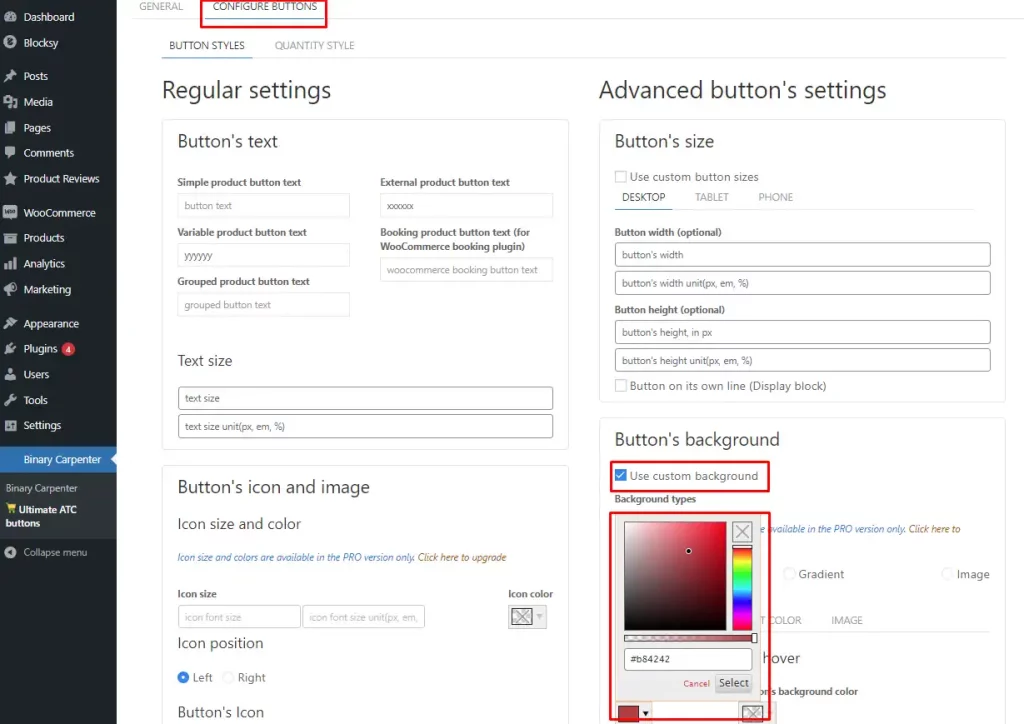
Go to WordPress Dashboard>Plugins>Add New and search by ‘Ultimate Custom Add-to-Cart Button For WooCommerce’. Install and activate the plugin and you will have a custom post type in the WordPress Dashboard named ‘Binary Carpenter’.
Click on the ‘Configure Buttons’ tab where you can choose any color for the button. The free version allows you to use a solid color for the button whereas the pro version gives more functionalities.
We have selected border color HEX #b84242 and text color HEX #fdfdfd. You can choose any color you like.
The final output is here for the product Archive pages. It is the same for single product pages as well.
How to add text above or below the WooCommerce Add-to-Cart button
To add text above or below the Add-to-Cart button, you should use custom codes for convenience. You may not get available free plugins for that and need to purchase pro-add-ons. However, we recommend using free custom codes.
You need to add custom codes in two different places. So, this process is divided into 2 parts.
- Part 1: Custom code in Functions.php
- Part 2: Custom code in Additional CSS
Part 1: Custom code in Functions.php
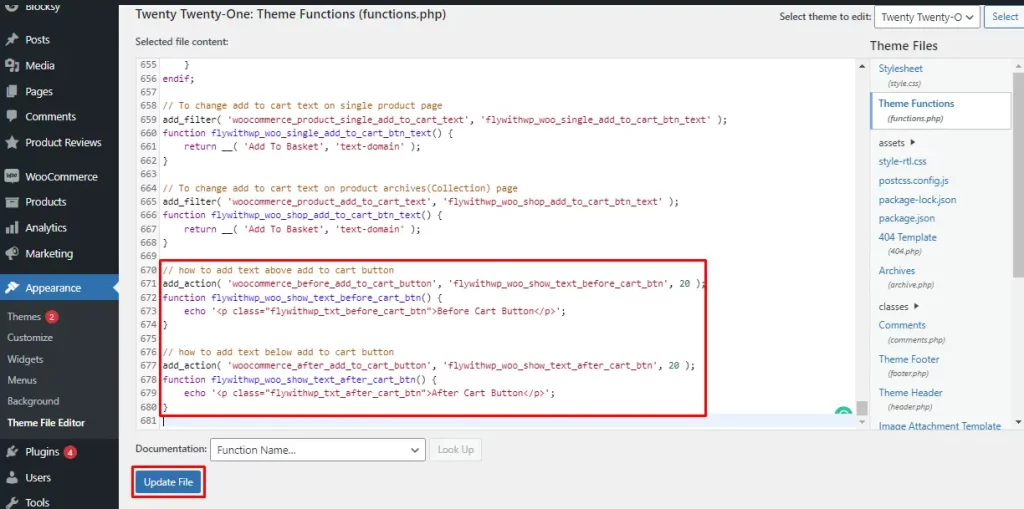
Go to WordPress Dashboard>Appearance>Theme File Editor and select Functions.php. Copy the code we are giving below and paste that at the end of the line.
We have used text for easy understanding. So, change the text as you need to use it inside the code.
- Before Cart Button
- After Cart Button
Code to add text above Add-to-Cart button
// how to add text above add to cart button
add_action( 'woocommerce_before_add_to_cart_button', 'flywithwp_woo_show_text_before_cart_btn', 20 );
function flywithwp_woo_show_text_before_cart_btn() {
    echo '<p class="flywithwp_txt_before_cart_btn">Before Cart Button</p>';
}
Code to add text below Add-to-Cart button
// how to add text below add to cart button
add_action( 'woocommerce_after_add_to_cart_button', 'flywithwp_woo_show_text_after_cart_btn', 20 );
function flywithwp_woo_show_text_after_cart_btn() {
    echo '<p class="flywithwp_txt_after_cart_btn">After Cart Button</p>';
}
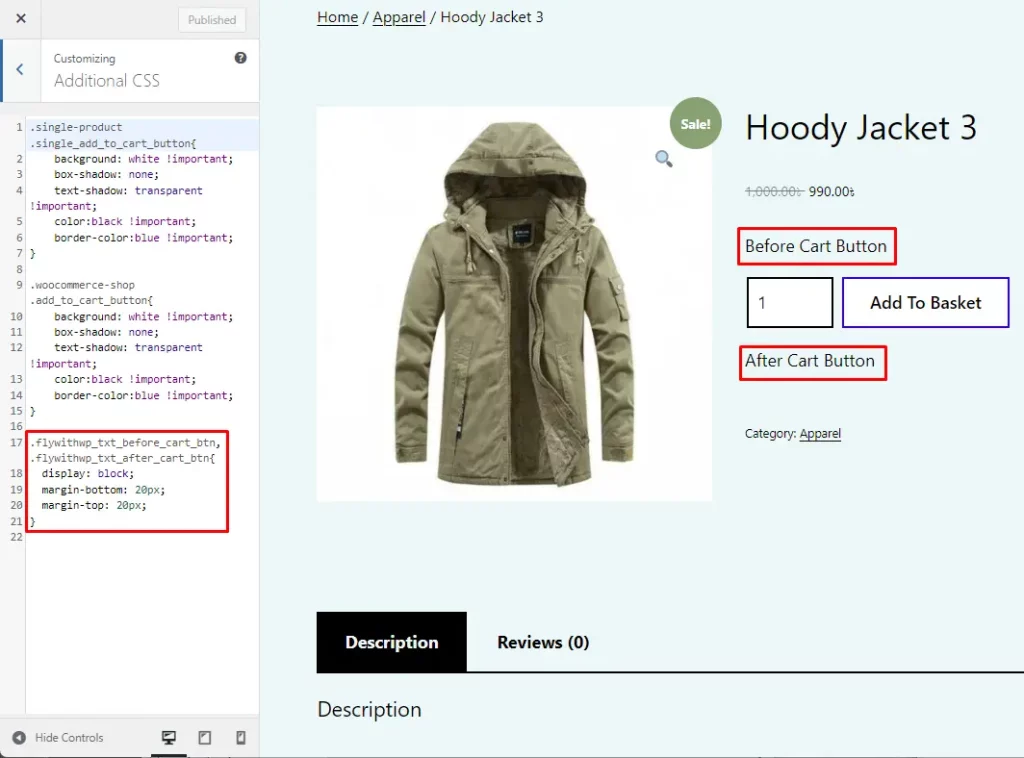
Part 2: Custom code in Additional CSS
Also, you need to use a code in the Additional CSS. Go to WordPress Dashboard>Appearance>Customize and inside Additional CSS, add the code.
We have used spacing between custom text and the Add-to-Cart button as below. You can increase or decrease the distance if you want.
- margin-bottom: 20px
- margin-top: 20px
Code for Additional CSS
.flywithwp_txt_before_cart_btn, .flywithwp_txt_after_cart_btn{
	display: block;
	margin-bottom: 20px;
	margin-top: 20px;
}
Note
Custom text insertion above and below Add-to-Cart button is appropriate for single product pages only.
Other Post Concerning WooCommerce
How To Add Custom Product Tabs To WooCommerce With Or Without Plugin?
How To Hide Additional Information Tab In WooCommerce
How To Remove Or Add Custom WooCommerce Terms And Conditions Checkbox?
Final Verdict
We have successfully gone through how to customize WooCommerce Add-to-Cart button with and without a plugin. Both ways are easy and have necessary modification facilities. However, according to our judgment, customizing the Add-to-Cart button is more flexible with custom codes.
Hope the tutorial was helpful for you to modify the default Add-to-Cart button. And, if it does, share your impression in the comment section below.
What is WooCommerce Add-to-Cart button?
WooCommerce Add-to-Cart button allows you to add your chosen products to the shopping basket during online purchases. When you have added all the products you wanted, proceed to the checkout page and you will find those.
Why is my Add-to-Cart button not working?
The main reason behind the failed operation of the Add-to-Cart button is the Permalinks. Make sure to update the settings of all the permalinks. If the problem still exists, it is better to consult a developer.
How do I enable the Add-to-Cart button on my shop page?
The Add-to-Cart button is enabled on the shop page by default. If not, follow the ‘How to Change Add-to-Cart Button Text in WooCommerce’ part of this tutorial.
Copy the code dedicated to Archive pages and you have the Add-to-Cart button. Or, you can use the ‘WooCommerce Custom Add-to-Cart Button’ plugin for the same.
How to remove WooCommerce Add-to-Cart button?
To remove WooCommerce Add-to-Cart button you can use custom codes or a plugin. Also, you can target product Archive pages or single product pages individually. Follow our step-by-step guideline on How To Remove Add-To-Cart Button in WooCommerce.