As an online business owner, you already know the importance of a checkout page and the fields within it. Sometimes you need to customize the checkout page by placing multiple custom fields to fulfill certain requirements. But it’s not a handy process with the default wooCommerce functions that demands a bit of extra effort.
No worries, we will guide you through the complete process on how to add extra fields in WooCommerce checkout form easily. But before jumping deep, let’s get to know more about the checkout form page.
What is the Checkout Form?
Checkout form page is the last bridge between ecommerce owners and users to confirm an order on an online store. The page collects billing, shipping, and additional information from the purchaser to complete an order.
Importance to Add Extra Fields on WooCommerce Checkout Page
Depending on the business type, you need to collect different information from the purchaser. So, to achieve this you are required to add extra fields to the WooCommerce checkout page.
For Example, you are selling alcohol and according to the law there is an age restriction. To stay on the safe side, you need to get assured that the consumers are old enough to buy alcohol online.
How to Add Extra Fields In WooCommerce Checkout Form Page?
Adding extra fields in WooCommerce checkout form is not as difficult as you thought. We bring you two different ways concerning that. And they are,
- How to add extra fields in WooCommerce checkout form without plugin
- How to add extra fields in WooCommerce checkout form with plugin
Add Extra Fields in WooCommerce Checkout Form Without Plugin?
Adding extra custom fields in the checkout form without a plugin is super easy and fun. You just need to place a tiny PHP custom script on the website.
But where do you want to add a field, in the billing or shipping section? Today, we will instruct you to add custom fields in both sections using a custom script. Also, you will have guidance to add an independent section with a few custom fields to personalize the checkout form.
Add Extra Fields in Billing Section of WooCommerce Checkout Form
First, copy the premade PHP script and go to the WordPress Dashboard>Appearance>Theme Editor>Function.php. Head to the bottom of the function.php file and paste the code. Now hit the save button.
We have added a field named “Your Age”, you can change it by editing the label and placeholder text.
// action for woocommerce checkout field add
add_filter( 'woocommerce_checkout_fields' , 'flywithwp_override_checkout_fields' );
// Our hooked in function – $fields is passed via the filter!
function flywithwp_override_checkout_fields( $fields ) {
    // custom Billing field
     $fields['billing']['billing_your_age'] = array(
        'label'     => __('Your Age', 'woocommerce'),
        'placeholder'   => _x('Age', 'placeholder', 'woocommerce'),
        'required'  => false,
        'class'     => array('form-row-wide'),
        'clear'     => true,
        'priority'     => 120, // <=====
     );
     return $fields;
}
/**
 * Display field value on the order edit page
 */
add_action( 'woocommerce_admin_order_data_after_billing_address', 'flywithwp_billing_checkout_field_display_admin_order_meta', 10, 1 );
function flywithwp_billing_checkout_field_display_admin_order_meta($order){
    echo '<p><strong>'.__('Age').':</strong> ' . get_post_meta( $order->get_id(), '_billing_your_age', true ) . '</p>';
}
Add Extra Fields in Shipping Section of WooCommerce Checkout Form
To add a custom shipping field in WooCommerce checkout form, copy the script below and paste it to the bottom of the Function.php file. Now hit the save button.
Again, if you want to edit the field name, just rename the label and placeholder text.
// action for woocommerce checkout field add
add_filter( 'woocommerce_checkout_fields' , 'flywithwp_override_checkout_fields' );
// Our hooked in function – $fields is passed via the filter!
function flywithwp_override_checkout_fields( $fields ) {
    // custom shipping field
     $fields['shipping']['shipping_House_No'] = array(
        'label'     => __('House No', 'woocommerce'),
        'placeholder'   => _x('Customer House No', 'placeholder', 'woocommerce'),
        'required'  => false,
        'class'     => array('form-row-wide'),
        'clear'     => true,
        'priority'     => 110, // <=====
     );
     return $fields;
}
/**
 * Display field value on the order edit page
 */
add_action( 'woocommerce_admin_order_data_after_shipping_address', 'flywithwp_shipping_checkout_field_display_admin_order_meta', 10, 1 );
function flywithwp_shipping_checkout_field_display_admin_order_meta($order){
    echo '<p><strong>'.__('House No').':</strong> ' . get_post_meta( $order->get_id(), '_shipping_House_No', true ) . '</p>';
}
Add Extra Fields in WooCommerce Shipping and Billing Section
If you are thinking of adding custom fields in both sections, the billing & shipping, at the same time. Copy the code snippet we have given below and paste it at the bottom of the fuintion.php.
// action for woocommerce checkout field add
add_filter( 'woocommerce_checkout_fields' , 'flywithwp_override_checkout_fields' );
// Our hooked in function – $fields is passed via the filter!
function flywithwp_override_checkout_fields( $fields ) {
    // custom shipping field
     $fields['shipping']['shipping_house_no'] = array(
        'label'     => __('House No', 'woocommerce'),
        'placeholder'   => _x('No', 'placeholder', 'woocommerce'),
        'required'  => false,
        'class'     => array('form-row-wide'),
        'clear'     => true,
        'priority'     => 110, // <=====
     );
    // custom Billing field
     $fields['billing']['billing_custom_age'] = array(
        'label'     => __('Your Age', 'woocommerce'),
        'placeholder'   => _x('Age', 'placeholder', 'woocommerce'),
        'required'  => false,
        'class'     => array('form-row-wide'),
        'clear'     => true,
        'priority'     => 120, // <=====
     );
     return $fields;
}
/**
 * Display field value on the order edit page
 */
add_action( 'woocommerce_admin_order_data_after_shipping_address', 'flywithwp_shipping_checkout_field_display_admin_order_meta', 10, 1 );
function flywithwp_shipping_checkout_field_display_admin_order_meta($order){
    echo '<p><strong>'.__('House No').':</strong> ' . get_post_meta( $order->get_id(), '_shipping_house_no', true ) . '</p>';
}
add_action( 'woocommerce_admin_order_data_after_billing_address', 'flywithwp_billing_checkout_field_display_admin_order_meta', 10, 1 );
function flywithwp_billing_checkout_field_display_admin_order_meta($order){
    echo '<p><strong>'.__('Your Age').':</strong> ' . get_post_meta( $order->get_id(), '_billing_custom_age', true ) . '</p>';
}
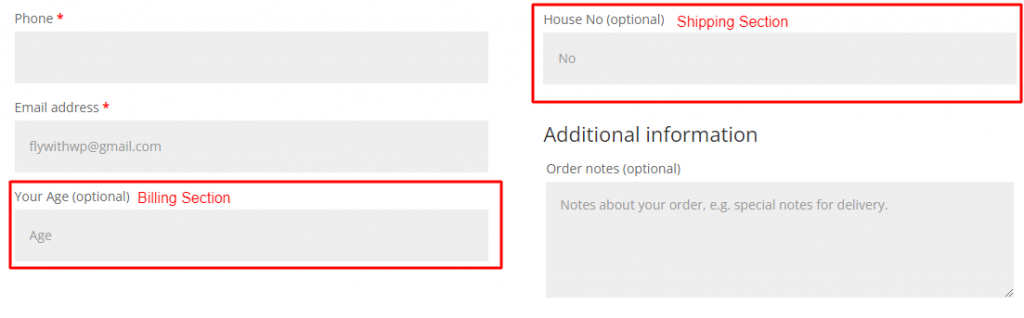
Here is the output that you will get after adding the snippet. Now if you want to rename the field, change the label and placeholder text as you want.
How to Add an Independent section with Custom Fields in Checkout Form
Often wooCommerce owners seek to add an independent section to collect more personalization data such as delivery time, purpose of buying or any other thing. So, we made a ready to use php script for that. Now just copy the code below and paste it at the bottom of the function.php file.
add_action( 'woocommerce_after_order_notes', 'flywithwp_custom_checkout_field' );
function flywithwp_custom_checkout_field( $checkout ) {
    echo '<div id="my_custom_checkout_field"><h2>' . __('My Custom Field') . '</h2>';
        woocommerce_form_field( 'fww_field_name_1', array(
            'type'          => 'text',
            'class'         => array('fww-field-class form-row-wide'),
            'label'         => __('Best Delivery Day'),
            'placeholder'   => __('Day'),
            'required'      => true,
        ), $checkout->get_value( 'fww_field_name_1' ));
        woocommerce_form_field( 'fww_field_name_2', array(
            'type'          => 'text',
            'class'         => array('fww-field-class form-row-wide'),
            'label'         => __('Best Delivery Time'),
            'placeholder'   => __('Time'),
            'required'      => true,
        ), $checkout->get_value( 'fww_field_name_2' ));
    echo '</div>';
}
/**
 * Process the checkout
 */
add_action('woocommerce_checkout_process', 'flywithwp_custom_checkout_field_process');
function flywithwp_custom_checkout_field_process() {
    // Check if set, if its not set add an error.
    if ( ! $_POST['fww_field_name_1'] )
        wc_add_notice( __( 'Please enter something into this field 1.' ), 'error' );
    if ( ! $_POST['fww_field_name_2'] )
        wc_add_notice( __( 'Please enter something into this field 2.' ), 'error' );
}
/**
 * Save the filed value
 */
add_action( 'woocommerce_checkout_update_order_meta', 'flywithwp_custom_checkout_field_update_order_meta' );
function flywithwp_custom_checkout_field_update_order_meta( $order_id ) {
    if ( ! empty( $_POST['fww_field_name_1'] ) ) {
        update_post_meta( $order_id, 'fww_field_name_1', sanitize_text_field( $_POST['fww_field_name_1'] ) );
    }
    if ( ! empty( $_POST['fww_field_name_2'] ) ) {
        update_post_meta( $order_id, 'fww_field_name_2', sanitize_text_field( $_POST['fww_field_name_2'] ) );
    }
}
/**
 * Display field value on the order edit page
 */
add_action( 'woocommerce_admin_order_data_after_billing_address', 'flywithwp_custom_checkout_field_display_admin_order_meta', 10, 1 );
function flywithwp_custom_checkout_field_display_admin_order_meta($order){
    echo '<p><strong>'.__('My Field 1').':</strong> ' . get_post_meta( $order->id, 'fww_field_name_1', true ) . '</p>';
    echo '<p><strong>'.__('My Field 2').':</strong> ' . get_post_meta( $order->id, 'fww_field_name_2', true ) . '</p>';
}
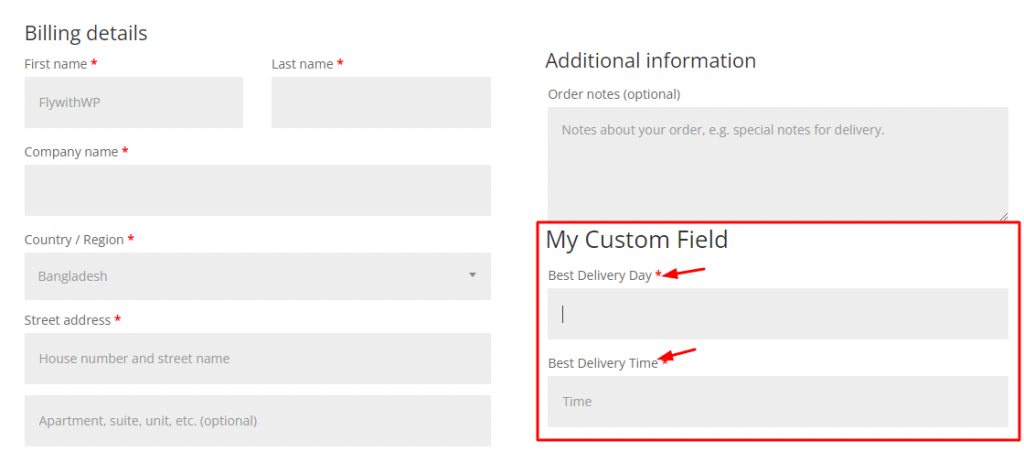
Here is the outcome of this script. You can do some changes in the label and placeholder text as you need them.
How to Add Extra Fields In WooCommerce Checkout Form With Plugin?
Adding extra fields in the checkout form using a plugin is comparatively easier than any other procedure. Today, we will use a plugin called Checkout Field Editor to add multiple custom fields in a minute.
So, without further ado let’s get started.
Step 1
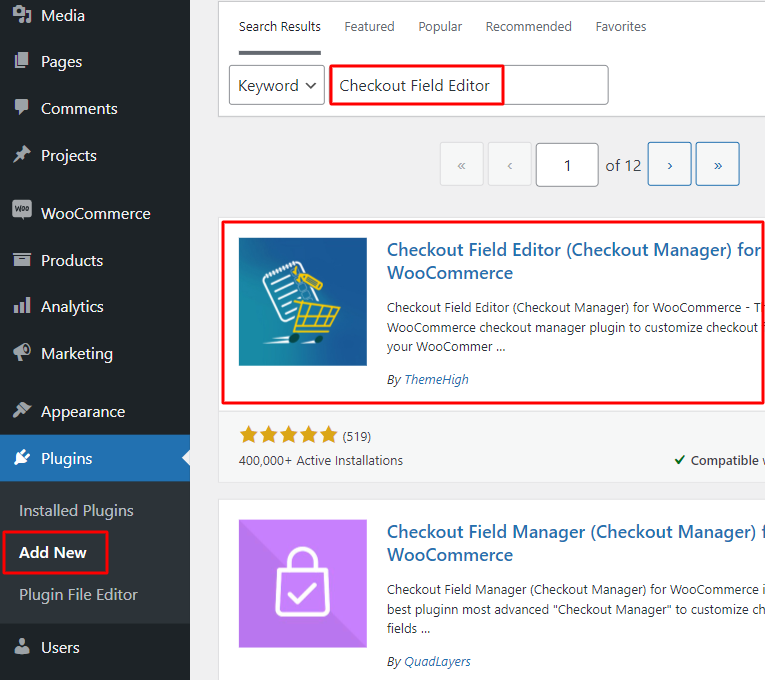
To begin, go to your WordPress Dashboard> Plugin>Add New and search for the checkout field editor. Next, install and activate the plugin.
Step 2
Next, click on the WooCommerce and open the checkout form setting. Select the billing, shipping, or additional field section wherever you want to add a new field.
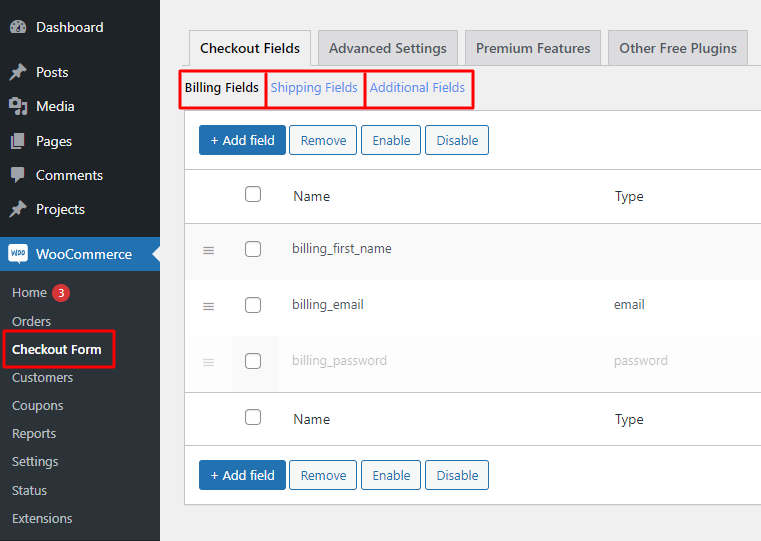
Step 3
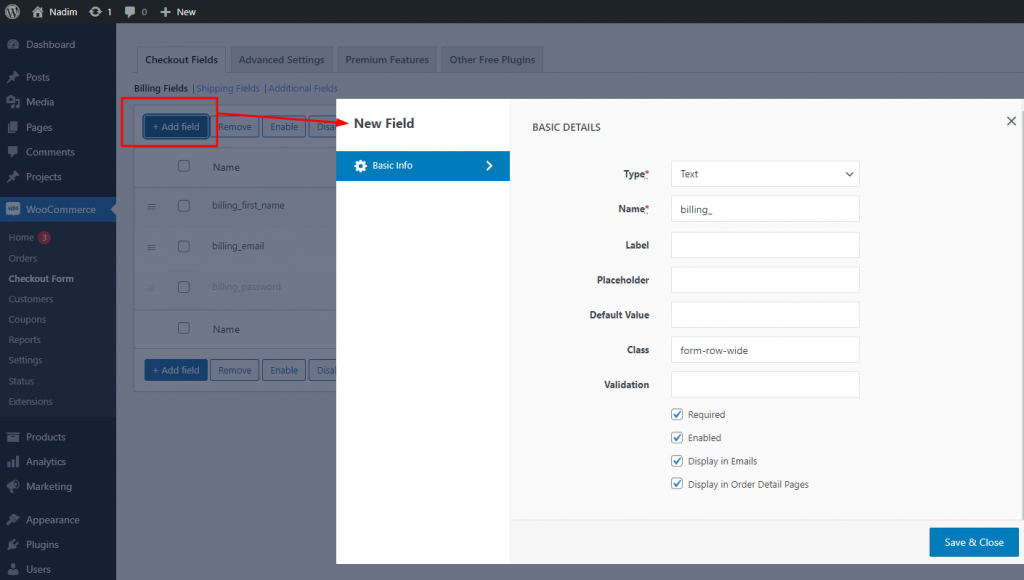
Afterward, clicking on the Add Field will bring a pop-up to put further details about the field. Select the field type, and give a field name, label, and placeholder text. Also, you have additional customization flexibilities to define the field as required or not. Finally, save & close.
Other Articles Concerning WooCommerce
How To Remove Or Add Custom WooCommerce Terms And Conditions Checkbox?
How To Open WooCommerce Terms And Conditions Link In A New Tab
How To Hide Additional Information Tab In WooCommerce
Conclusion
Creating and adding extra fields in WooCommerce checkout form is a short thing even for a beginner. If you have a very basic understanding of PHP code, use a custom script to keep your website lightweight. On the other hand, if you want and love to work with plugins, follow the second process to achieve that.
Let us know in the comment box if you have any difficulties or seek counseling regarding the issue.
FAQ
Can I add extra fields to the woo-Commerce checkout page?
Yes, you can add multiple fields in the checkout page using custom code or plugin. Read this article to get the solution for how you can add extra fields in WooCommerce checkout form page.
How to install wooCommerce checkout field editor pro?
First of all, log in to the WordPress Dashboard>Plugin>Add New and search for the Checkout Field Editor and install it. Now, you can get the pro version from the plugin section or download it from their official site.