How to Install Acabado Theme
Before we begin our “How to customize Acabado theme” tutorial, let’s talk over a short guide to installing the Acabado theme. Since it is a paid theme, you can’t find it on the WordPress official repository. But, if you have purchased this theme or have a membership in Project 24, you surely have the download version.
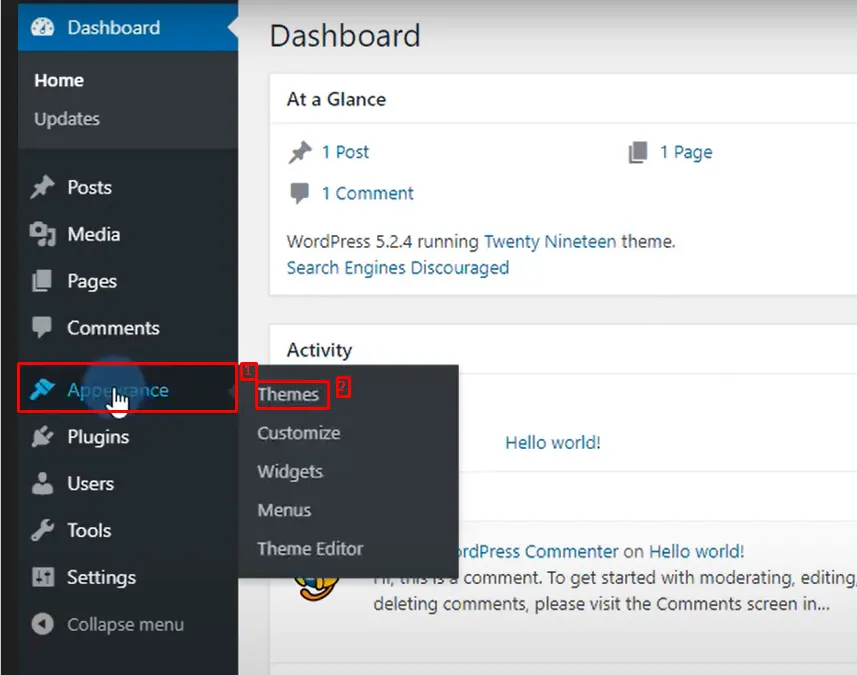
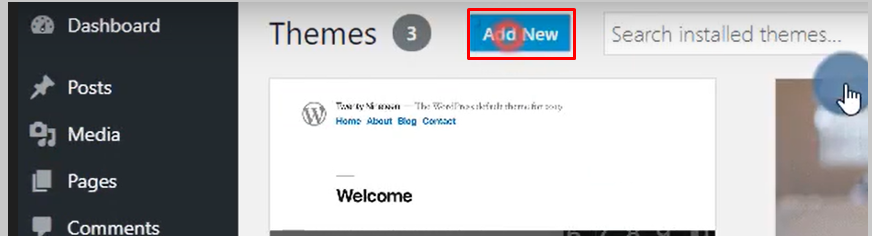
So, go to the WordPress dashboard and navigate to Appearance> Themes> Add New> Upload Theme> Choose File> Install Now> Activate. Now, go to the Acabado Manager and add your subscription Email address. Remember, it will be the same email that you have used to make the subscription and activate it.
Next, a new page will appear with some recommended plugins. You can install the needed plugins. And, you are set to go. Let’s see how you can customize the Acabado theme.
Attention Please
First, we want to draw your attention to a few unique customization rules of the Acabado theme.
- You can’t use an image with the wrong resolution. This theme restricts images with inadequate height and width.
- For an updated version, you need to manually update the theme.
- Has three options to design a homepage.
How to Customize Acabado Theme
Now, we will find out how you can beautify the website’s appearance with the Acabado theme. Most of the features of this theme can be controlled from the Acabado Settings. You can find it on your WordPress dashboard. Clicking the setting will access you to other settings to customize the theme. Let’s discuss them one by one.
Acabado Settings
Let’s go through the general setting. In your WordPress dashboard follow this, Acabado Settings> Acabado settings. You will find all general settings including Logo, and Favicon. Further, here’s a setting for hiding the hamburger icon and you can also choose to show menu items for particular screen sizes.
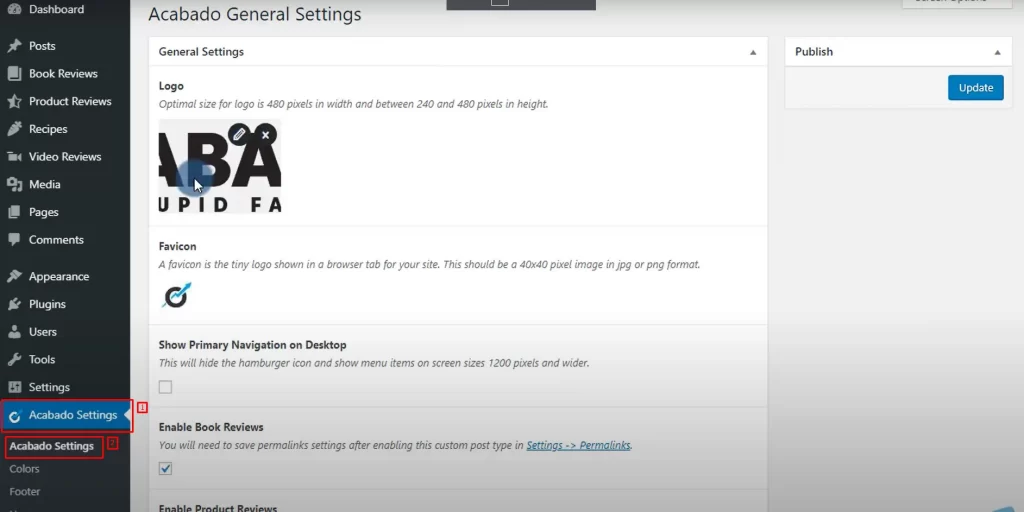
Within this area, you can also choose to enable or disable features such as review options for Book, Video, Product, and Recipes. For example, you may not want these features if you are not running an affiliate site or food blogging site.
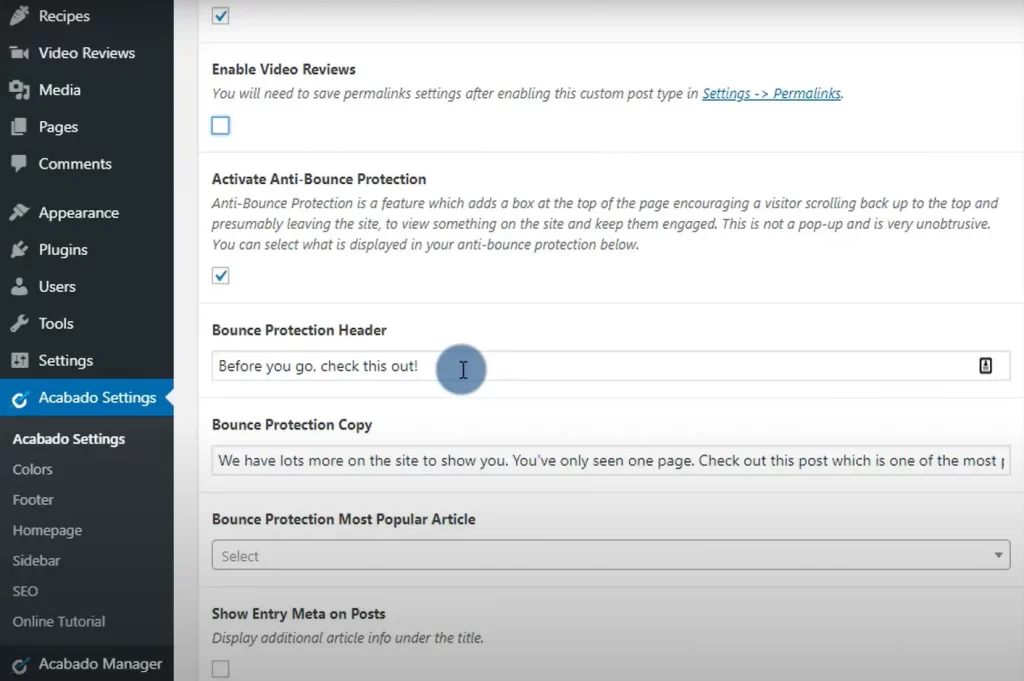
Now come down, you will find one of the cool features of this theme- Anti Bounce Protection. Along with selecting the most popular article, there are elements to edit Header & copy for this feature.
From this Acabado settings, you will be able to make some customization for the blog page as well. These helpful customizations let you choose to activate the comment section, display featured images, and show additional info like author, date, etc. Now, scroll down, and you will find the area to add some custom code, disable Ad spaces, and label the Menu icon.
Colors
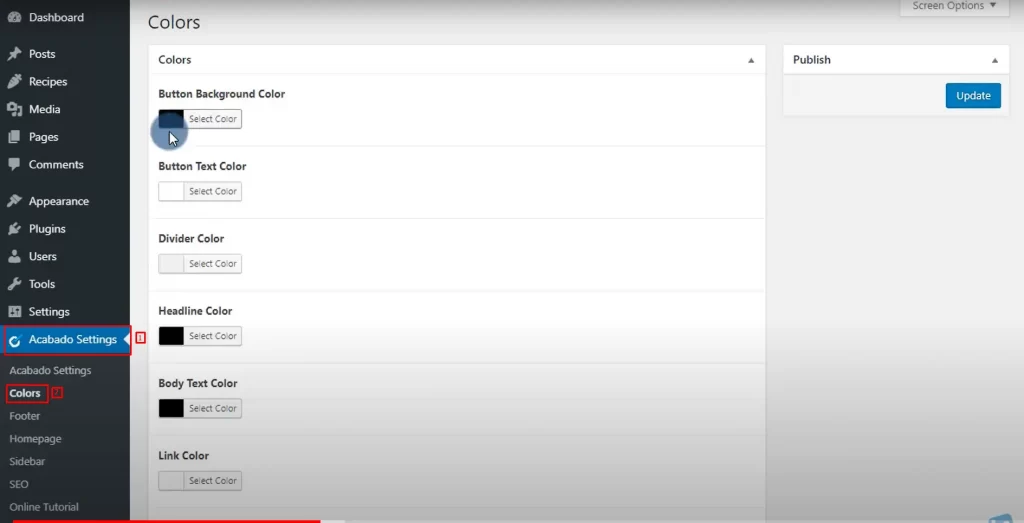
You can find the color settings under Acabado Settings> Colors. This settings option gives you full control of the color pallet across your entire website from one place. You can change the background and text color of the Button, Section Header, and Anti-bounce Section. There are also color settings for Divider, Headline, Body Text, Link, Homepage Hero text, and many more.
Footer
The footer settings in the Acabado theme just got a place to add some text. Further, there is a Footer Ad option.
Homepage
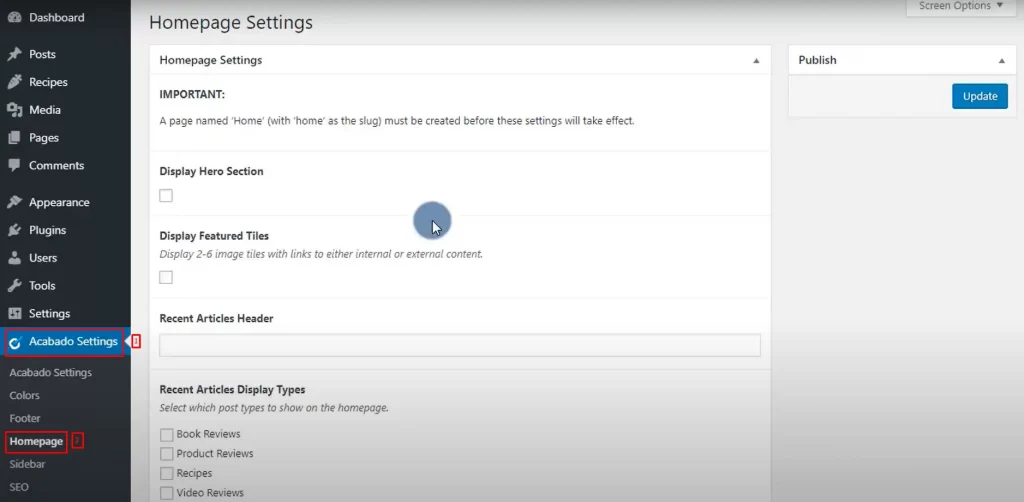
Before getting started with the homepage setting, you need to have a page called home for using all its functions. Now, this setting opens up the option for “Display Hero Section” and its further customizations. Display Featured Tiles option is also available in this settings area. Specifically, you can add tile text, links, and background images for homepage featured tiles. Additionally, there are a few more settings to choose post types for Recent Articles.
Sidebar
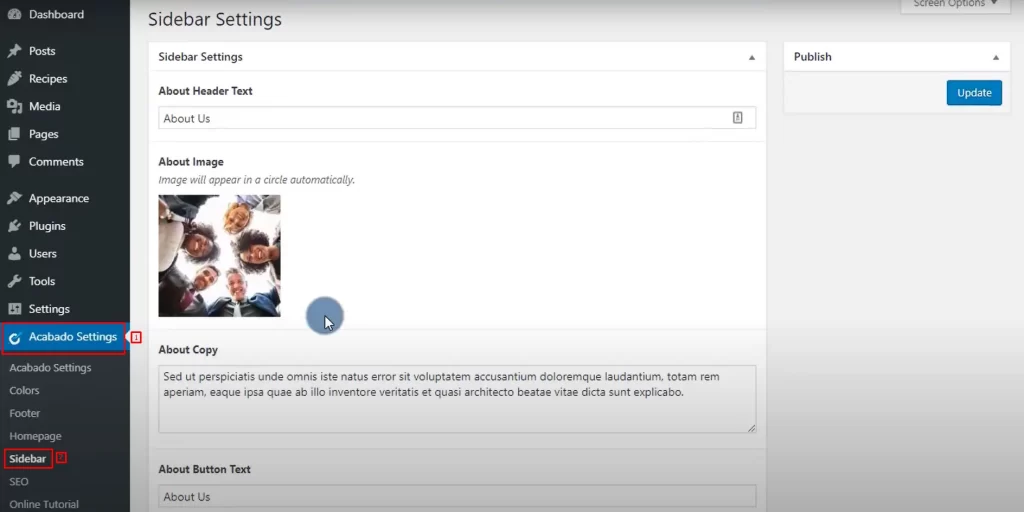
Let’s show you how to customize the sidebar. You can add About information with header text, image, and about copy-text. Moreover, there are options for editing the About Button Text and inserting a link to About Button. Also, the sidebar facilitates areas to add Legal information & ADs. Besides, you can edit the heading and copy-text.
SEO
From the SEO settings, you will see the functionality to build XML Sitemaps. Even more, you can add the Site Title and Description.
Online Tutorial
If you are stuck while customizing the Acabado Theme, you can easily access the tutorial through Acabado Settings. You will find inclusive videos, blogs, and documentation for every feature of this theme.
Special Features To Customize Affiliate Website
For those of you who are using the Acabado theme with an affiliate website in mind, this will be the best part. You are going to see how to customize your product review pages. We are also covering the Video Review, Book Review, and Recipe features.
Video Reviews
For adding a video review, navigate to Video Reviews> Add New Review in your WordPress dashboard. Here, you can write a title. Then, there are settings for embedding a video URL and inserting a thumbnail image. The next section will let you add all the information about the product including Star Rating, Amazon Purchase Link, and Product Image. In the following settings, you can also add other products’ brand names and URLs. Lastly, you will have Post/page settings like adding meta descriptions.
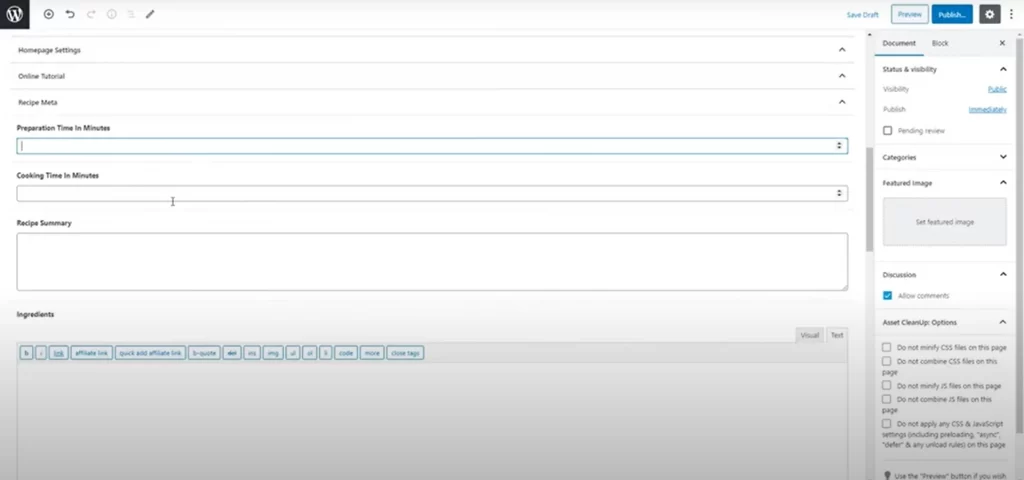
Recipes
The recipe content is fun to read. Let’s see how you can add a recipe post with the Acabado theme. For this follow, Recipes> Add New Recipe in your WordPress dashboard. The first thing you can do is, add a title. Then scroll down, and you will see the Recipe Meta setting, which will reveal options such as Preparation Time, Cooking Time, Recipe Summary, Ingredients, and Instructions. Even more, you can include multiple rows for listing Ingredients and Instructions.
Product Reviews
You can make great use of this feature while writing product review content. It comes with features like Ratings, and Add Images. You can also include Amazon Purchase Link and Product Image. Further, you have settings for posts and pages.
Book Reviews
In a similar way, you can add a Book review article. You can add the author’s name, ratings, image, and purchase link. Post/page settings will be also there as well for other customizations.
Builder Compatibility
The Acabado theme is compatible with popular page builder plugins like Divi and Elementor.
How to customize the Acabado theme homepage?
To customize the Acabado theme homepage, navigate to Acabado Settings > Homepage. There will be settings for display customization. You can add a hero image above the content section. To do this, you have to tick the Display Hero Section box. It will reveal the function as add image or button.
Moreover, you will also find an option to display featured images. Where you can add clickable featured images by clicking the “Display Featured Images”. Now, you can add information through the plus (+) sign or the “Add Featured Tile” button. Click the minus button, if you don’t want any tile.
Even more, you can choose to show schema posts on the home page. To do this, check any boxes under “Recent Articles Display Types”. Lastly, after doing all the customization, don’t forget to hit the “Update” button on the right side of your screen before leaving the page.
Some Common Issues of Acabado Theme
Acabado users have some common issues while using the theme. As we already explained all the renowned and helpful features of the theme, It’s time to discuss the problems you might have for a long time. So, let’s talk no more and get the solutions right away.
Acabado Theme Not Updating?
Currently, you will not be able to update your Acabado theme in a regular way. Clicking the “Update Now” button is not working due to some errors. Hence, you have to go through a manual way.
First, if you have a Project 24 membership or an Acabado license, log in to the Income School website. Then, you have to follow More Resources> Acabado Theme. Click on “Download Acabado Here”, which will lead you to another page with all the versions. But you just click the “Download the Latest Version of Acabado ”.
After the successful download, you have to follow the regular installation way. Go to the backend of the website and follow Appearance> Add New Theme> Upload Theme> Choose File> Install Now> Activate.
Now, WordPress will recognize that you have two versions of the same theme. And, you will be asked to choose one. So, you will definitely choose the latest one. However, here you will see a little difference. There will be both versions of the Acabado theme. So you have to delete the previous one.
But before that, what you need to do is visit the homepage of your website. If there are no website settings issues, just delete the old version.
Conclusion
This post shows all the effective ways to customize the Acabado theme. We hope you can customize a visually appealing site that will be optimized for super speed. Nevertheless, don’t hesitate to ask any questions, or give any suggestions and feedback on our tutorial in the comment box.
Can you grow an email list using this theme?
Thanks for question Tesla. It’s a bit of difficult process to follow but I have another easiest way to do grow your email list. Just follow this article. Hope it will be helpful for you.
Thank you, so Mailchimp is compatible with Acobado? I read articles that said Acabado is not compatible with such plug-ins. Also, is there a way to offer info products using this theme (a lead magnet for example).
I am afraid you have to ask a developer to build a custom lead magnet template for you. As we have build for FlywithWP.