Blocksy free version provides a huge fonts collection besides its system fonts but they are loaded from other servers, not self-hosted. Adding custom fonts locally such as Google fonts, DaFont, etc. lets your website load faster. Also, some other issues may arise if you do not have locally hosted fonts.
So, here we are going to learn the way to add custom fonts in Blocksy free from two different sources.
Ways are;
Note
Since the method is based on WordPress, the process will work with any other theme. Use a child theme for more convenience.
Why It’s Important to Add Custom Fonts in Blocksy Free?
It is important to host fonts locally in Blocksy free version for several reasons. Two of the reasons are vital and they are;
- Faster website loading
- Complying with GDPR
Faster website loading
Suppose, it’s about Google cloud fonts. They are not locally hosted, and each time a visitor comes to your website, the font request goes to Google cloud. But, if they are hosted on your local server, the fonts will be loaded directly and performance will be noticeable.
Complying with GDPR
The European Union has a strict restriction under GDPR on using embedded fonts due to personal data protection. To avoid the claim, you need to host the fonts locally and then use them for your website.
As we have learned about the importance of adding custom fonts locally, let’s go for the process, shall we?
How to add Custom Google fonts locally in Blocksy free
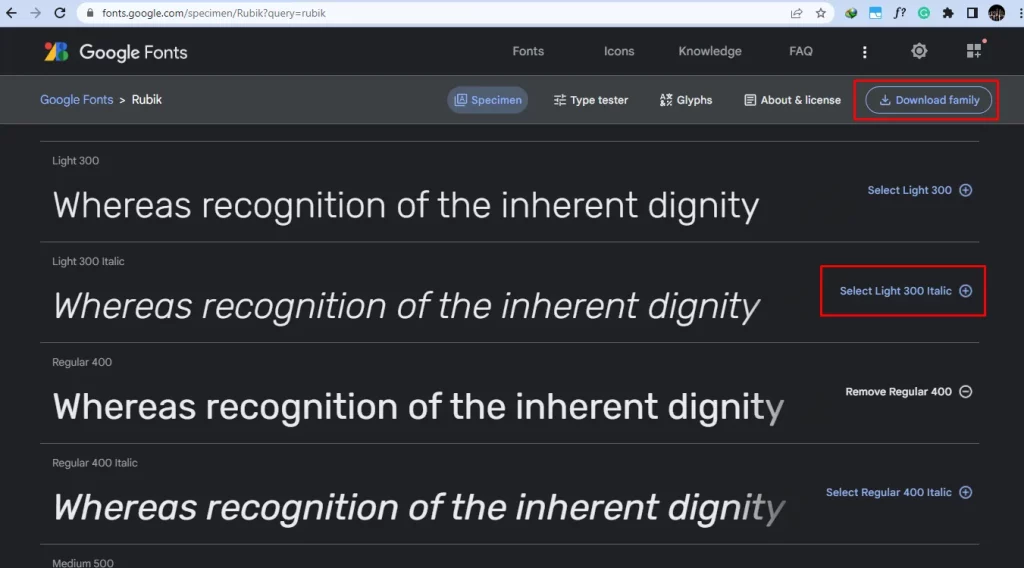
To add a Google font locally, go to fonts.google.com and download any font you want. I am demonstrating with a font named ‘Rubik-Italic’.
Let’s start with the step-by-step instructions
Step 1: Converting The Google Font
Go to fontsquirrel.com and convert the downloaded font into 2 different formats;
- TTF
- WOFF
Note
This is not mandatory to use fonts in 2 formats but should be effective for better compatibility
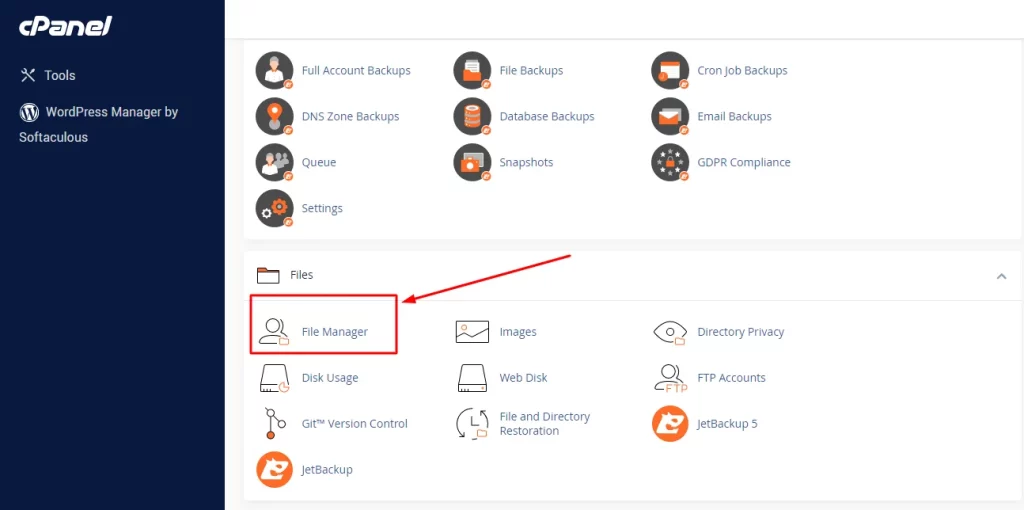
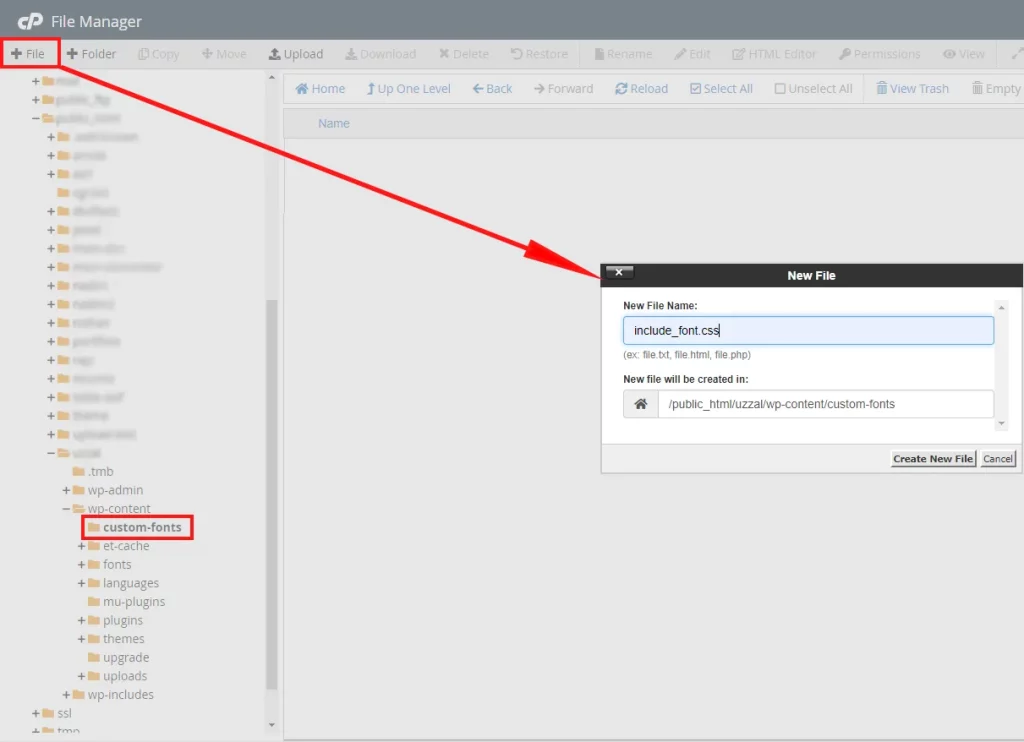
Step 2: Adding The Google Font in cPanel
Go to your website cPanel and look for ‘File Manager’. Get into that.
Now, go to the user panel and open the ‘wp-content’ folder.
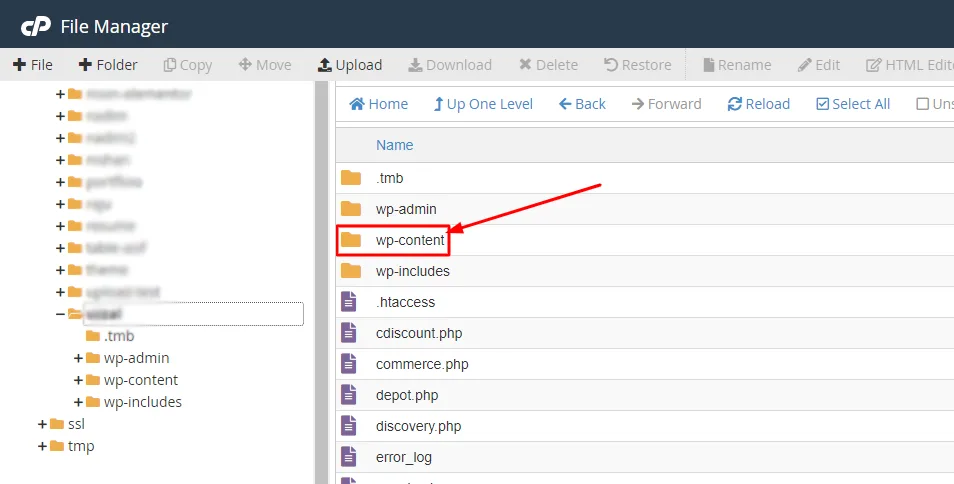
Inside the ‘wp-content’ folder, do as below;
- Create a folder named ‘custom-fonts’
- Inside the folder, create a ‘CSS’ file named ‘include_font.css’
- Add below code snippet into that.
The snippet contains information about the ‘Rubik Italic’ font in both TTF and WOFF formats. If you use a different font, edit the code snippet accordingly.
Code for ‘include_font.css’ for the Google font:
@font-face {
    font-family: 'CustomFont';
    src: url('Rubik-Italic.ttf') format('ttf'),
         url('Rubik-Italic.woff') format('woff');
    font-weight: normal;
    font-style: normal;
}
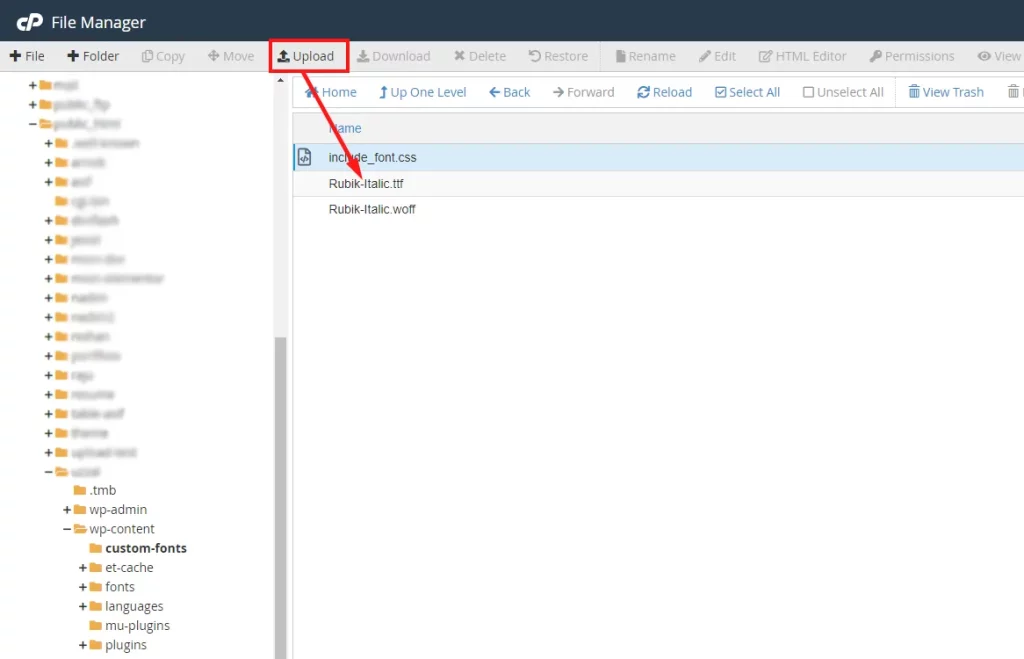
Now, use the ‘Upload’ button to add fonts with the ‘include_font.css’ file.
Step 3: Custom Code In Function.PHP
Go to the WordPress Dashboard>Appearance>Theme Editor and add the following code to the bottom of the functions.php.
Code for functions.php:
function add_custom_fonts() {
    wp_enqueue_style( 'my-styles', WP_CONTENT_URL . '/custom-fonts/include_font.css', array(), '1.0.0' );
}
add_action( 'wp_enqueue_scripts', 'add_custom_fonts' );
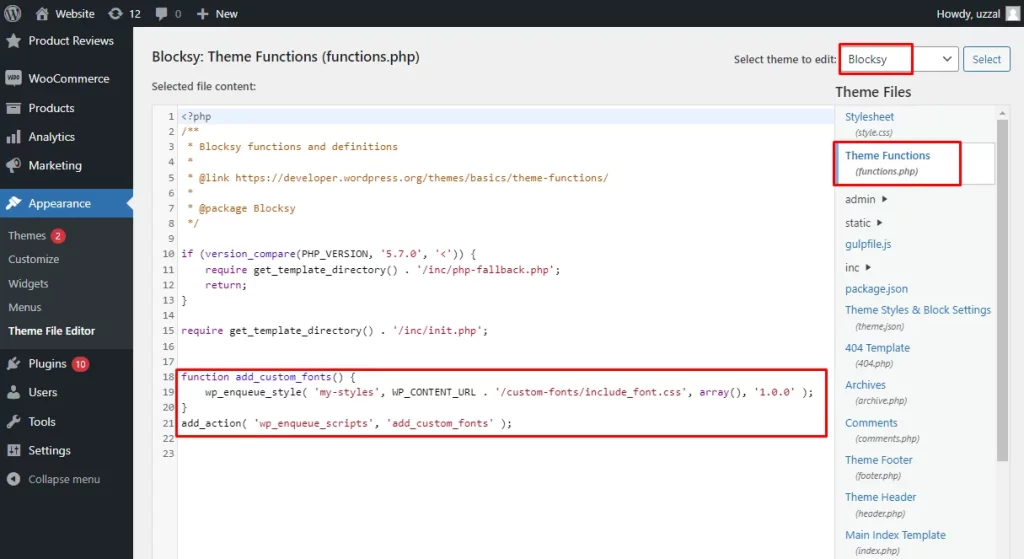
Note
If you need to add more fonts, just edit the ‘include_font.css’ file in cPanel accordingly. No further changes needed in the functions.php.
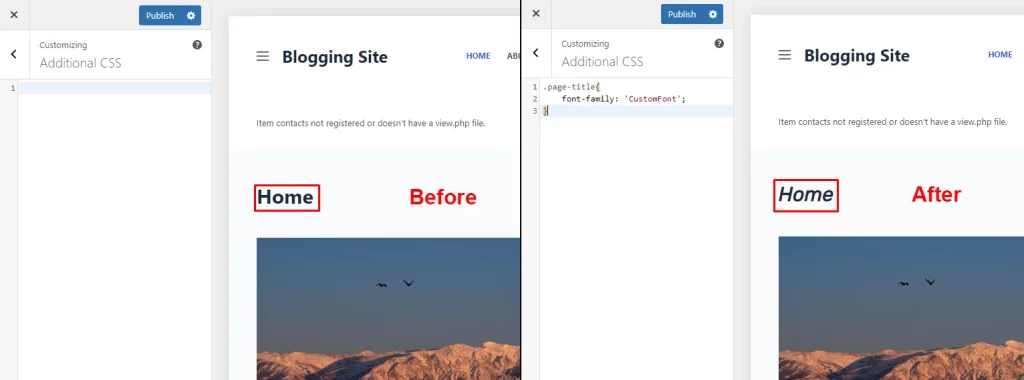
Step 4: Custom Code for Additional CSS
Go to WordPress Dashboard>Appearance>Customize and inside ‘Additional CSS’ add the below code. Use the font family name exactly the same as mentioned in the ‘include_font.css’ file.
I am using the font for the page title only. Also, there are 3 more code snippets for different areas of your website. Further, if you need to use the font for other areas, just inspect the element for CSS class and change the first part of the code.
Code for Additional CSS
For Page Title:
.page-title{
    font-family: 'CustomFont';
}
For Body Text:
body {
    font-family: 'CustomFont';
}
For Heading 3:
h3 {
    font-family: 'CustomFont';
}
For CTA Button:
.ct-button {
    font-family: 'CustomFont';
}
See the result in the before and after illustration. If you cannot see the changes even after doing everything right, clear the cache of your browser and reload the page. You will see the final output for sure.
How to add DaFont fonts locally in Blocksy free
The entire process of adding a font from DaFont is the same as adding Google fonts as mentioned above. However, there will be differences in the font family, font name, and formats. So, the codes should be prepared precisely following that otherwise, it will not work properly.
As you have got the entire process, there is no need for a detailed presentation. So, I will go briefly for this one.
Choosing A Font
I have downloaded the font ‘aAbsoluteEmpire’ from dafont.com for this process and converted the format.
Editing ‘include_font.css’ file
In the cPanel’s ‘custom-fonts’ folder, edit the ‘include_font.css’ file to add codes for the ‘aAbsoluteEmpire’ font in different formats.
I have named the ‘aAbsoluteEmpire’ font family as’CustomFont2’ in the code snippet.
Code for ‘include_font.css’ for the aAbsoluteEmpire font:
@font-face {
    font-family: 'CustomFont2';
    src: url('aAbsoluteEmpire.ttf') format('ttf'),
         url('aAbsoluteEmpire.woff') format('woff'),
         url('aAbsoluteEmpire.woff2') format('woff2'),
         url('aAbsoluteEmpire.otf') format('otf');
    font-weight: normal;
    font-style: normal;
}
Uploading Fonts in cPanel
Upload all the font formats in the ‘cusom-fonts’ folder in cPanel to have them locally.
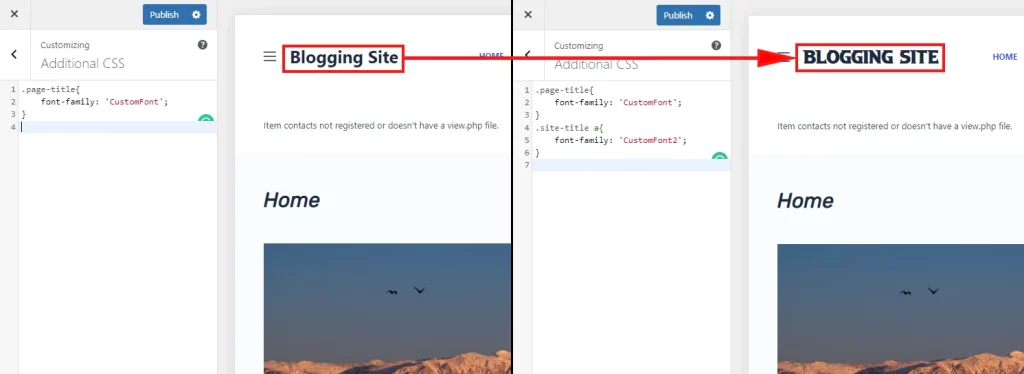
Custom Code in Additional CSS
I am using ‘aAbsoluteEmpire’ for the site title and created code for that.
Code for Additional CSS for the custom font:
.site-title a{
    font-family: 'CustomFont2';
}
Use this font for other areas by changing the code, as mentioned for the Google fonts.
See the final result before and after using the code. Here as well, clear the cache if you do not see the changes.
Conclusion
We have gone through an effective process on how to add custom fonts in the Blocksy free version. The entire process is actually based on WordPress and works beautifully with any other theme. So, if you need to add custom fonts locally, just follow the steps properly.
However, there is another way of adding custom fonts in WordPress using a third-party plugin. Though the plugin allows you to do things in a similar way it may bloat the website a little bit. I personally prefer using custom codes to keep the website lightweight.
Hope the tutorial was helpful. If you have any queries concerning fonts, feel free to ask us in the comment section below. We will be happy to help you with that.
FAQ
What is a custom font in WordPress?
Custom fonts are the fonts that are not directly available with the WordPress or the theme. You need to add them locally to avail for website design. For that, you need to purchase any font or download free fonts as you need. To add them to WordPress, use custom codes or a third-party plugin.
Does Blocksy theme support Google fonts?
Yes, Blocksy theme supports Google fonts and all are available with the free Companion plugin. Also, you can avail all the Google fonts locally if you purchase Blocksy Companion pro plugin.
Should I load Google Fonts locally for my WordPress website?
Technically, you should use Google fonts locally in WordPress before building your website. You will have better scoring on website loading speed. Also, your website will be safe from a claim concerning font use.
What does loading Google Fonts locally mean?
Loading Google fonts locally means availing them in the website cPanel file manager. This process gives you relief from using Google cloud fonts once and for all.
Is it better to link or import Google Fonts?
Linking Google fonts in WordPress is like locating the path of the cloud fonts. And, importing Google fonts means hosting the fonts locally on your website. So, it is better to import Google fonts as they are not dependent on cloud sources.